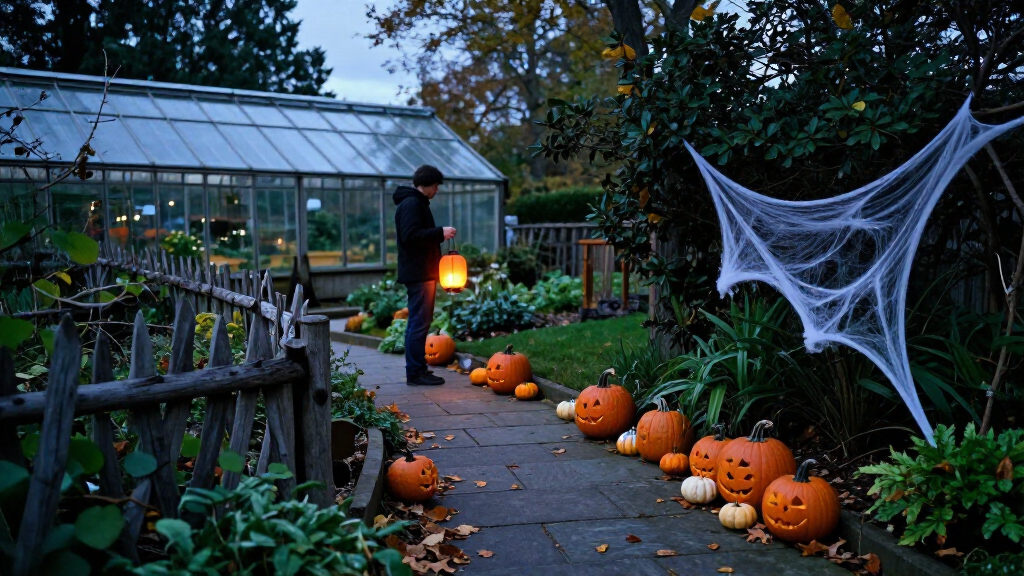
Set up a spooky outdoor Halloween display using lights, simple props, and a clear path that visitors can navigate safely. This guide is for beginners decorating a porch, yard, walkway, or entry. Plan for about 2-4 hours of setup, depending on the size of the display and whether your decorations need assembly.

Get garden gear delivered free — and shop member deals
- Fast, free delivery on millions of items
- Access to Prime Big Deal Days deals on October 6–7
- Prime Video, Amazon Music and more included

OCATO 200-inch Halloween Spider Web and 59-inch Giant Spider Décor
- ✔ Brand: OCATO
- ✔ Included pieces: Giant spider, web, ground stakes, and gutter hook
- ✔ Web size: 200 inches

JOYIN 3-Pack Hanging Halloween Grim Reaper Skeleton Decorations
- ✔ Brand: JOYIN
- ✔ Quantity: 3 pieces
- ✔ Largest reaper height: 53 inches
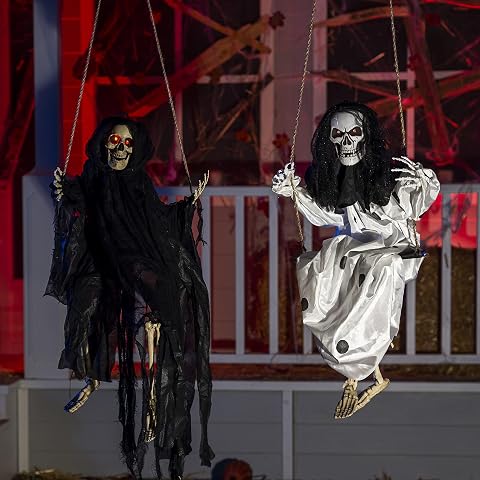
JOYIN 2-Piece Halloween Hanging Swinging Skeleton Decorations with LED Eyes
- ✔ Brand: JOYIN
- ✔ Quantity: 2 pieces
- ✔ Materials: Fabric
You will choose a theme, check the space, arrange decorations, test lighting and sound, and secure everything against wind and damp weather. The finished setup should look eerie from the street without blocking doors, steps, sidewalks, or the route to your home.
Difficulty: Beginner | Time: 2-4 hours, plus shopping and any prop assembly
What You’ll Need
Tools & Materials:
- Outdoor-rated extension cords, if needed
- Outdoor-rated lights or battery-operated lights
- Ground stakes, zip ties, or outdoor clips
- Scissors or garden shears
- Flashlight
- Weather-resistant decorations
- Optional: speaker, timer, fog machine, or motion sensor
Knowledge:
- Basic awareness of your yard’s walkways, steps, and electrical outlets
- Ability to follow the labels and safety instructions on lights and powered decorations
Allow extra time to shop, inflate, assemble, or paint props. Check local rules for sidewalks, shared paths, open flames, and amplified sound. Use only products marked for outdoor use, and follow their instructions. Keep powered equipment and connections away from standing water. Choose flame-free candles, especially near fabric, paper, dry leaves, or other decorations.
OCATO 200-inch Halloween Spider Web and 59-inch Giant Spider Décor
When we want one decoration to define the whole scene, the 59-inch spider and 200-inch web have an advantage over the two hanging-figure sets: their scale can cover a substantial wall, fence, or yard corner instead of relying on several smaller silhouettes. The black web, textured furry body, and red eyes create a clear horror theme that reads from a distance. Included stakes and a gutter hook also give us more mounting approaches than a hanging-only set.That scale is the main reason to rank it first—and its biggest limitation. In a compact porch or narrow entry, the web may overwhelm the available space or be difficult to position attractively. The spider’s legs may need adjustment to achieve the intended pose, so setup is not entirely hands-off. Compared with the JOYIN reapers, this is less flexible for spreading decorations across separate trees or doorways; compared with the LED skeletons, it does not offer a built-in light for after-dark visibility. It is the best all-around centerpiece when we can give it room, but not the most versatile choice for small or highly changeable displays.The set is described as foldable and weather-resistant, which supports seasonal reuse, but we should still secure it properly and avoid assuming that lightweight construction is storm-proof. Its horror-forward look may also be too intense for homes aiming for a playful, child-friendly Halloween scene.
Pros:
- Large spider and web create a strong focal point
- Stakes and a gutter hook offer multiple mounting options
- Foldable, reusable design is practical for seasonal storage
- Weather-resistant construction is suited to outdoor display
Cons:
- The oversized web can be difficult to fit in a small space
- Spider legs may need adjustment to get the desired pose
- The intense horror styling may not suit young children
Best for: We want a large, recognizable centerpiece for a broad fence, wall, or yard display.
Not ideal for: We have a small porch, prefer gentle decorations, or need a compact ornament that can be moved between several locations.
Bottom line: We choose this first when space allows, because its broad, dramatic web gives an outdoor display more immediate impact than either hanging set.
“We choose this first when space allows, because its broad, dramatic web gives an outdoor display more immediate impact than either hanging set.”
JOYIN 3-Pack Hanging Halloween Grim Reaper Skeleton Decorations
The three different-sized grim reapers make this the most adaptable option for building a scene across a porch, branches, or an entryway. At up to 53 inches tall, the largest figure can anchor the arrangement, while the smaller 31.5-inch reaper helps create a staggered group rather than a row of identical decorations. Their adjustable arms give us another way to vary the silhouettes, making them feel more animated than fixed-position figures.Compared with the OCATO spider, these reapers are easier to distribute across separate hanging points and do not require one large web-shaped display area. They also offer more figures than the two-piece LED skeleton set. The tradeoff is that they do not have the LED eyes that make the other JOYIN option easier to notice at night, and their hanging format depends on having suitable supports. Their light construction can be vulnerable in wind, while prolonged sun exposure may wear on the latex and plastic components. We should plan to bring them in or shelter them when conditions turn harsh.This is our choice for a layered, traditional haunted-house look rather than a single oversized focal point. The robes and adjustable limbs offer good composition options, but buyers seeking a bold ground-level centerpiece or a self-lit nighttime effect should look to the spider or LED skeletons instead.
Pros:
- Three figures provide more display coverage than either two-piece set
- Different heights make it easier to create a layered composition
- Adjustable arms allow varied poses
- Latex, plastic, and fabric construction is intended for seasonal reuse
Cons:
- Lightweight figures may move or suffer damage in wind
- Prolonged sun exposure may degrade latex and plastic parts
- No built-in lighting for nighttime visibility
Best for: We want several hanging figures in different sizes to create a floating, layered porch, tree, or entry display.
Not ideal for: We lack secure hanging points, expect frequent high winds, or prioritize visible lighting after dark.
Bottom line: We recommend this set over the skeleton pair when display flexibility and three distinct hanging silhouettes matter more than glowing eyes.
“We recommend this set over the skeleton pair when display flexibility and three distinct hanging silhouettes matter more than glowing eyes.”
JOYIN 2-Piece Halloween Hanging Swinging Skeleton Decorations with LED Eyes
If our Halloween display is mainly seen after sunset, the LED eyes give these two hanging skeletons a specific advantage over the unlit reapers and spider set. Their black-and-white contrast adds visual variation, and the figures can hang together as a pair or be placed separately on a porch, patio, or tree. The 46.8-inch black skeleton and 36-inch white one also provide a noticeable size difference without needing the larger footprint of the OCATO web.This is a more focused pick than the reaper trio. We get two illuminated figures rather than three adjustable-armed reapers, so there is less variety for filling multiple hanging points. If we separate the skeletons, each needs its own secure place to hang. The supplied description identifies fabric construction and indoor/outdoor use, but also warns that harsh weather may degrade the material; for exposed sites, sheltered placement and taking them down in severe conditions are sensible precautions.Compared with the spider, these skeletons are easier to fit into a smaller scene and contribute a nighttime cue without demanding a broad wall or fence. However, they will not create the same large-scale centerpiece, and the lighting detail should not be mistaken for a guarantee of full-yard illumination. We rank them third overall because their main advantage is specific and useful, but narrower: evening visibility rather than maximum scale or the most flexible group display.
Pros:
- LED eyes help the figures stand out at night
- Two different sizes add contrast to a hanging display
- Figures can be displayed together or separately
- Suitable for indoor or outdoor placement
Cons:
- Harsh weather may wear down the fabric
- Separate displays require separate hanging points
- Two figures provide less coverage than the three-reaper set
Best for: We need compact hanging figures with a distinctive glow for a porch or patio that is viewed after dark.
Not ideal for: We want a large daytime focal point, need to decorate several locations with one set, or cannot protect fabric figures from harsh weather.
Bottom line: We pick these skeletons when after-dark visibility matters more than the bigger footprint of the spider or the extra figure in the reaper set.
“We pick these skeletons when after-dark visibility matters more than the bigger footprint of the spider or the extra figure in the reaper set.”
As an Amazon Associate we earn from qualifying purchases.
Before You Start
Walk the display area during daylight and after dark if possible. Identify the main viewing angle, the route visitors will take, stairs or uneven ground, and the locations of outlets. Check the weather forecast and inspect decorations for damage. Keep sidewalks, driveways, doorways, handrails, and emergency exits clear. If you use a fog machine or sound, check that the effect will not spill into a street or disturb neighbors.
Sketch a simple layout before placing anything. Group a few large props as focal points, then add smaller details and lighting. A deliberate arrangement usually looks spookier and is easier to secure than filling every available space.
Step-by-Step Instructions
Step 1: Choose a theme and viewing area
Pick one main theme, such as a haunted graveyard, a spider-covered porch, or a ghostly path. Choose the area people will see first, such as the front door or the yard facing the street. Sketch where the largest props, lights, and any sound source will go.
Plan a clear walking route to the entrance. Mark stairs, changes in ground level, and any place where cords must cross. Avoid placing props where they can block sightlines for drivers or people using the walkway.
Tip: Use a small number of large shapes as the main scene, then add a few details that fit the same theme.
Check: Your sketch shows a clear focal point, a visitor route, and locations for lights and props.
Step 2: Check the site and prepare the ground
Remove loose branches, garden tools, hoses, and other trip hazards from the display and walking route. Check that the ground is firm enough for stakes and that props will not interfere with doors, gates, handrails, or utility access. Locate outdoor-rated outlets and measure the distance to planned lights before choosing cord lengths.
Inspect each decoration, cord, plug, and light string. Do not use items with cracked housings, exposed wires, loose connections, or missing safety labels. Keep electrical connections off the ground and away from rain or puddles, following the product instructions.
Tip: If the area gets wet, use battery-operated decorations or lights rather than placing a powered item there.
Check: The route is clear, the ground is ready for props, and you have identified safe power options.
Step 3: Place the large props first
Set out the largest decorations first, such as tombstones, a skeleton, a large spider, or a hanging ghost. Position them around the edge of the route or behind a clear boundary so visitors do not have to walk through them. Face the main props toward the street or the approach to your door.
Anchor freestanding items with the supplied stakes, weights, or ties. Secure hanging decorations to supports made for outdoor use, not to weak branches or unstable railings. Keep lightweight fabric and plastic away from hot bulbs, heaters, and flames.
Tip: Leave enough space between props for people to pass without brushing against them, even when carrying a bag or holding a child’s hand.
Check: The focal props face the intended viewing area, stand securely, and do not narrow the walkway.
Step 4: Add smaller details and lighting
Add smaller items, such as faux webs, plastic bones, signs, or ground-level figures, after the large props are in place. Keep fake webbing and loose fabric out of the path and away from trees or shrubs where wildlife can become caught.
Place outdoor-rated lights to show the focal props and the edges of the walking route. Use low, indirect lighting for a shadowy effect, but keep steps and changes in ground level visible. Route cords along the edges of the display; do not leave them stretched across a walkway. Secure cords with suitable clips or covers designed for outdoor use, and connect them only as the product instructions allow.
Tip: Test lights as you place them. A flashlight can help you spot dark gaps, glare, and trip hazards before visitors arrive.
Check: The main decorations are visible at night, the route is easy to see, and no loose cord crosses the path.
Step 5: Set up sound, motion, or fog effects
If you use a speaker, motion sensor, or fog machine, place it where it cannot block the route or get bumped. Aim sound toward your property and keep the volume low enough that visitors can hear instructions and nearby traffic. Set motion effects to activate only when someone approaches the display, not when people pass on a public sidewalk.
Follow the device’s outdoor-use, clearance, ventilation, and power instructions. Do not use fog or flashing lights where they could obscure steps, affect drivers, or create a hazard for people with sensitivities. Skip an effect if you cannot operate it safely in the weather.
Tip: Try each effect from the visitor’s approach. A sound that seems quiet beside the speaker may be much louder at the property line.
Check: Each effect works as intended without masking voices, blocking visibility, or spilling into a public route.
Step 6: Test the full display after dark
Turn on every light and effect at the time you expect to use the display. Walk the visitor route from the street to the door, then return to the street and check the display from its main viewing angle. Look for cords, unstable props, glare, dark steps, and items that move in the wind.
Ask another person to walk the route if available. Move anything that feels easy to trip over or that forces a visitor to step off the path. Adjust light positions until both the scene and the walking surface are visible.
Tip: Check the display again after rain or strong wind, and before visitors arrive on Halloween night.
Check: Visitors can approach and reach the door without stepping over objects, and the display reads clearly from outside.
Step 7: Secure, operate, and take down the decorations
Before the event, tighten stakes and ties, confirm cords and plugs are dry and protected as instructed, and test any timer or motion sensor. Turn off or unplug decorations when they are not in use, following the product directions. Bring battery packs and delicate items inside if the forecast calls for heavy rain or strong winds.
After Halloween, switch off and unplug powered items before taking them down. Remove cords without pulling on the wire, clean and dry decorations, and store them in labeled containers. Replace damaged electrical items rather than trying to repair them unless the manufacturer provides an approved repair method.
Tip: Photograph the finished layout before taking it down; the image can help you repeat the setup next year.
Check: The display stays in place during use, and everything is switched off and stored dry after the event.
Common Mistakes to Avoid
- Filling the walkway with props, cords, or low-hanging decorations. — Keep the visitor route open from the sidewalk to the door. Walk it in the dark before opening the display and move anything that catches a foot, shoulder, or bag.
- Using indoor lights or damaged cords outdoors. — Choose products labeled for outdoor use, inspect them before setup, and follow the manufacturer’s connection and weather instructions.
- Relying on unsecured props or fabric in windy weather. — Use suitable stakes, weights, or ties, and remove or bring in lightweight items when wind could carry them away.
- Making the display so dark that visitors cannot see steps or uneven ground. — Keep the spooky lighting around the props, but add steady, low-glare light to stairs and the route to the door.
Troubleshooting
Problem: A light string or decoration does not turn on.
Solution: Switch it off and inspect the plug, batteries, and visible connections according to the product instructions. Try a known-working outlet only if the item and outlet are rated for outdoor use. Replace damaged equipment; do not use a frayed cord or bypass a safety feature.
Problem: Props tip over or decorations flap in the wind.
Solution: Reposition them on firmer ground and use the supplied stakes, weights, or ties. Bring in items that cannot be secured safely, especially fabric, inflatables, and tall lightweight props.
Problem: The display is difficult to see from the street.
Solution: Move the focal props into a clearer sightline, aim lights at their surfaces, and reduce competing light sources or visual clutter. Check again from the approach rather than standing beside the decorations.
Problem: Fog, sound, or flashing effects bother visitors or affect the route.
Solution: Turn the effect off or reduce its intensity. Reposition sound toward your property and keep the path and nearby street free of obscuring fog, glare, and sudden effects.
What Success Looks Like
Your display has a clear Halloween theme and a visible focal point from the intended viewing area. Props remain stable, lights and effects work as planned, and visitors can see and walk the route to the entrance without crossing cords or dodging decorations. Powered items are outdoor-rated and used according to their instructions. After the event, equipment can be switched off and stored safely.
Next Steps
Check the setup before each evening of use and after wind or rain. Remove decorations that loosen, become wet where they should stay dry, or obstruct the route. After Halloween, clean and dry reusable items, store electrical decorations away from moisture, and label any damaged products for replacement before next season. If a powered decoration repeatedly trips a circuit or shows visible damage, stop using it and contact the manufacturer or a qualified electrician as appropriate.
Frequently Asked Questions
How can I make outdoor decorations look spooky without buying many props?
Choose one focal prop, such as a skeleton or a few tombstones, and use directional lights to create shadows. Add inexpensive details that match the theme, such as dark fabric secured away from bulbs, paper signs protected from weather, or faux webs kept out of the walking route.
How do I keep Halloween decorations from blowing away?
Anchor props with their supplied stakes, weights, or ties, and use supports rated for outdoor use. Check the forecast, then bring in lightweight decorations when wind is strong. Do not tie decorations to a tree or railing that cannot safely bear the load.
Can I use regular extension cords outside?
Use only cords marked for outdoor use and follow the cord and decoration instructions for load, connection, and weather exposure. Keep connections out of standing water and do not run cords where people walk or where doors can pinch them.
How can I keep the display spooky while making the path safe?
Use dimmer, indirect light on the props and steady light on steps, edges, and changes in ground level. Remove loose decorations from the route, secure cords along its edge, and walk the full path after dark before visitors arrive.
Fall yard work Picks
leaf blowers
As an affiliate, we earn on qualifying purchases.