TL;DR

Get garden gear delivered free — and shop member deals
- Fast, free delivery on millions of items
- Access to Prime Big Deal Days deals on October 6–7
- Prime Video, Amazon Music and more included
Soil solarization uses the sun’s heat to kill pests, weeds, and diseases in soil. It involves covering moist soil with plastic during peak summer, raising soil temperatures to lethal levels. This eco-friendly method works best in hot, sunny climates and can drastically reduce garden pests without chemicals.
Imagine turning the blazing summer heat into a free, all-natural pest control system. No chemicals, no fuss. Just the sun, a plastic sheet, and some prepared soil. That’s soil solarization in a nutshell — a simple, powerful way to fight pests in your desert garden while boosting soil health.
If you’ve ever dealt with stubborn nematodes or soil-borne fungi, you know how frustrating they can be. Soil solarization offers a natural solution that uses what’s already around you — the intense desert sun. It’s a technique that’s easy to do, cost-effective, and environmentally friendly.
In this guide, you’ll learn exactly how soil solarization works, what you need to get started, and how to get the best results. Plus, I’ll share recent developments and tips for making it work in your specific desert climate.
Soil solarization can reach lethal temperatures of 43–54°C (110–130°F) within 4–6 weeks during peak summer.
Using clear plastic and moist soil are key to trapping heat and killing pests effectively.
It works best in hot, sunny climates—less so in cooler or overcast areas.
Recent innovations like biodegradable films and mulching boost efficiency and eco-friendliness.
Timing your solarization in July or August maximizes pest control and soil health benefits.
Soil Solarization: Turning Summer Heat Into Free Pest Control
Cover moist soil with clear plastic during peak summer and let the sun do the work. In 4–6 weeks, temperatures of 43–54°C (110–130°F) eliminate nematodes, fungi, bacteria, and weed seeds — with zero chemicals and zero cost beyond a sheet of plastic.
Why Desert Heat Is Your Greatest Ally
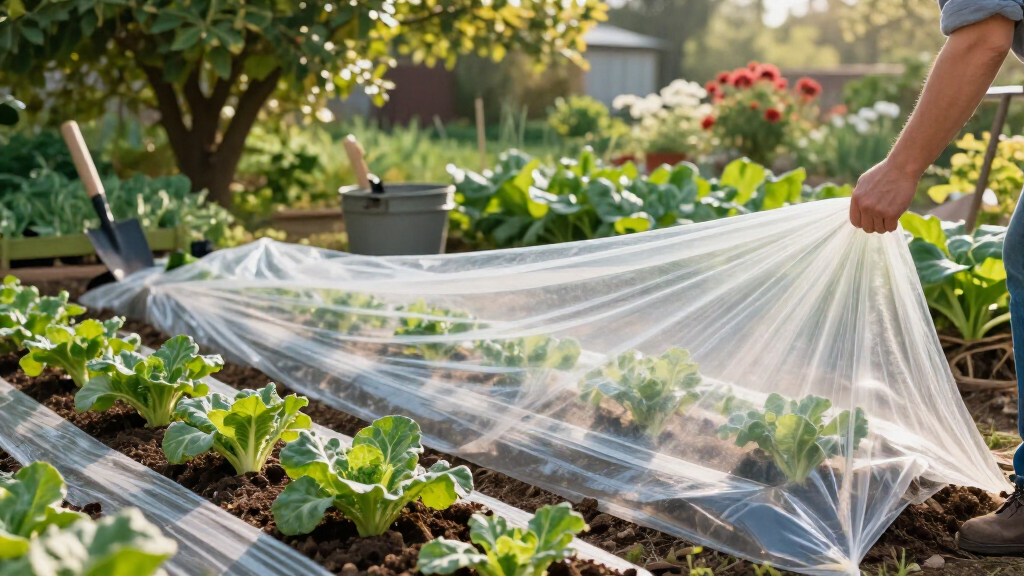
Soil solarization traps solar energy under a clear plastic cover, turning garden beds into a slow underground oven. Moist soil conducts heat deeper into the profile, while sealed edges prevent escape — creating a greenhouse effect just below the surface.
High temperatures kill pests directly and disrupt their life cycles, preventing re-infestation. A Phoenix gardener can water her beds in July, seal them with plastic, and watch root-knot nematodes and wilt-causing fungi decline dramatically within weeks.
In cooler or cloudy climates, results may be limited, requiring longer periods or supplemental heating. Consistent high temperatures — the signature of desert summers — are what make this method work.
Five Steps to a Sterilized Garden Bed
Prepare the Soil
Remove weeds and debris; loosen the surface so heat penetrates evenly and pest hiding spots disappear.
Water Thoroughly
Moist soil conducts heat deeper, reaching pests hidden beneath the surface uniformly.
Cover with Plastic
Use clear polyethylene, 1–2 mil thick. Secure edges with rocks, bricks, or soil to trap heat.
Leave in Place
Keep sealed for 4–6 weeks during the hottest stretch — ideally July or August.
Monitor & Remove
Check temperatures, then remove plastic promptly. Expect healthier structure and revived microbes.
Solarization vs. Other Pest Control Methods
| Method | Pros | Cons |
|---|---|---|
| Soil SolarizationEco-friendly choice | ✓ Chemical-free ✓ Improves soil health ✓ Cost-effective ✓ No toxic residue for family, pets & beneficial microbes | ✗ Requires hot, sunny weather ✗ Takes 4–6 weeks ✗ Less effective in cooler climates |
| Chemical FumigationFast industrial option | ✓ Fast-acting ✓ Effective against many pests | ✗ Toxic chemicals ✗ Risks to humans and pets ✗ Harms beneficial soil organisms |
| Crop Rotation & AmendmentsLong-term strategy | ✓ Sustainable ✓ Improves soil over time ✓ Supports pest-resistant plants | ✗ Slower results ✗ Requires planning and knowledge |
Combining solarization with organic practices — rotation, compost, biological controls — builds the most resilient garden ecosystem over time. Its natural-heat approach leaves no chemical residues, making it safer for your family, pets, and soil microbes.
Smarter, Greener Solarization
Biodegradable Films
New plastic films break down naturally after use, cutting plastic waste. Engineered to resist tears during the long solarization period while maintaining high temperatures longer and more uniformly.
Organic Amendments
Compost teas and biochar applied before or during treatment enhance pest suppression, boost fertility, and stimulate beneficial microbial activity for healthier post-treatment soil.
Mulching Under Plastic
An organic mulch layer beneath the sheet traps extra heat and moisture — especially valuable in fast-drying desert soils — further raising treatment efficacy.
Portable Solarization Kits
Clear covers with built-in temperature monitoring now serve urban and small-scale gardeners, bringing natural heat pest control to balconies and limited-space plots.
Make It Work in Your Climate
Time it right
Choose the hottest months — July and August are ideal. Higher temperatures eradicate pests faster and more completely.
Go clear, not black
Clear plastic lets radiation enter and heat the soil directly; black plastic shades it. Standard is clear polyethylene at 1–2 mil.
Seal the edges tightly
Heat escape is the enemy. Bury or weight all edges with rocks, bricks, or soil to keep temperatures lethal.
Remove plastic promptly
After 4–6 weeks, take the sheet off to avoid trapped moisture, fungal problems, or soil compaction.
Reader FAQ
How long does it take to work?
Typically 4–6 weeks during the hottest months of the year.
Is it safe for plants and humans?
Yes — it’s chemical-free and poses no risk when properly conducted.
Does it work in all climates?
It works best in hot, sunny regions; effectiveness diminishes in cooler, cloudier areas.
What plastic should I use?
Clear polyethylene is standard; biodegradable options are emerging but vary in effectiveness.
Will it improve soil fertility?
Indirectly yes — fewer pests and pathogens promote healthier, more vigorous plant growth.
Are there environmental concerns?
Traditional sheeting creates plastic waste; biodegradable films mitigate this issue.
Can I solarize a small garden?
Absolutely — the method suits small-scale and backyard gardening, even raised beds.
Will it kill beneficial microbes too?
Some heat-sensitive species decline, but microbial activity typically rebounds — often with more favorable balance.
What Is Soil Solarization and Why It Works in Desert Gardens
Soil solarization is a method of heating soil to kill pests, weeds, and disease-causing organisms by trapping solar energy under a clear plastic cover. It works by raising soil temperatures to levels that are lethal for many pests—think 43–54°C (110–130°F)—at just a few inches deep.
In desert climates, the blistering heat is your biggest ally. During peak summer, the sun’s rays can turn your garden soil into an oven. Covering moist soil with transparent plastic enhances this effect, trapping heat and creating a mini greenhouse underground.
For example, a gardener in Phoenix might water her vegetable beds thoroughly in July, cover them with plastic, and watch soil temperatures soar during the day. After 4–6 weeks, many pests like root-knot nematodes or fungi that cause wilt are dramatically reduced, paving the way for healthier plants.
Understanding why this works is crucial: the high temperatures not only kill pests directly but also disrupt their life cycles, preventing re-infestation. This method provides a non-chemical way to manage soil pests sustainably. However, it’s important to note that the effectiveness depends on consistent high temperatures, which are characteristic of desert summers. In cooler or less sunny climates, results may be limited or require longer periods or supplemental heating methods.
clear plastic garden mulch for soil solarization
As an affiliate, we earn on qualifying purchases.
As an affiliate, we earn on qualifying purchases.
Step-by-Step: How to Solarize Soil in Your Desert Garden
- Prepare the soil: Remove weeds, debris, and loosen the soil surface to ensure even heat distribution and reduce pest hiding spots. A loose surface allows heat to penetrate more effectively, increasing the temperature at pest habitats.
- Water thoroughly: Aim for moist soil—this helps conduct heat deeper into the soil profile. Moisture acts as a conductor, ensuring the heat reaches pests hidden beneath the surface, making the process more effective and uniform.
- Cover with plastic: Use clear polyethylene plastic, about 1–2 mil thick. Secure the edges with rocks, bricks, or soil to trap heat. Proper sealing prevents heat escape, maintaining high temperatures necessary for pest eradication.
- Leave in place: Keep the plastic for 4–6 weeks during the hottest part of summer, preferably in July or August. The duration is critical because it allows temperatures to sustain at lethal levels long enough to destroy pests and pathogens thoroughly.
- Monitor and check: After the period, carefully remove the plastic and examine the soil. Expect to see a significant decline in pest activity, healthier soil structure, and possibly an increase in microbial activity, indicating a rejuvenated soil environment.
For example, a backyard gardener in Tucson might water her bed on a July morning, lay plastic over it by midday, and leave it sealed through the hottest weeks. The intense sun turns the soil into a sterilizing oven, but it’s essential to monitor soil temperature to ensure it reaches the necessary levels for effective pest control without damaging soil life.
Tradeoffs include the time investment and the need for high summer temperatures. In cooler climates or seasons, this method might be less effective or require longer periods, which could increase the risk of weed seed germination if not managed carefully. Additionally, plastic mulch needs to be removed promptly after the treatment to prevent moisture retention that could lead to fungal issues or soil compaction.
garden soil solarization plastic sheet
As an affiliate, we earn on qualifying purchases.
As an affiliate, we earn on qualifying purchases.
Compare Soil Solarization to Other Pest Control Methods
| Method | Pros | Cons |
|---|---|---|
| Soil Solarization | Eco-friendly, chemical-free, improves soil health, cost-effective | Requires hot weather, takes 4–6 weeks, less effective in cooler climates |
| Chemical Soil Fumigation | Fast, effective against many pests | Uses toxic chemicals, risks for humans and pets, can harm beneficial organisms |
| Crop Rotation & Organic Amendments | Sustainable, improves soil over time, pest-resistant plants | Slower results, requires planning and knowledge |
When comparing these methods, soil solarization stands out as a particularly sustainable choice for desert gardeners. Its reliance on natural heat means no chemical residues remain, making it safer for your family, pets, and beneficial soil microbes. However, it’s important to recognize its limitations: it’s most effective during the peak heat months and may not eliminate all types of soil pests or weeds immediately. Combining solarization with other organic practices can lead to a more resilient and healthy garden ecosystem over time.
eco-friendly soil solarization film
As an affiliate, we earn on qualifying purchases.
As an affiliate, we earn on qualifying purchases.
Recent Innovations Making Soil Solarization Easier and Greener
Researchers are working on smarter ways to boost soil solarization. One exciting development is the use of biodegradable plastic films that break down naturally, reducing plastic waste and environmental impact. These eco-friendly films are designed to resist tears and degradation during the long solarization period, maintaining high temperatures longer and more uniformly.
Some growers are experimenting with organic soil amendments—like compost teas or biochar—before or during solarization. These additions can enhance pest suppression, improve soil fertility, and stimulate beneficial microbial activity, creating a healthier soil environment post-treatment. Mulching under the plastic can also trap more heat and moisture, especially in areas where soil tends to dry out quickly, further boosting the effectiveness of the process.
For urban or small-scale gardeners, portable solarization kits equipped with clear covers and temperature monitoring devices are now available. These innovations make the technique more accessible, allowing even limited space gardens to take advantage of natural heat for pest control. As technology advances, soil solarization is becoming not only more effective but also more environmentally sustainable, aligning with organic gardening principles and reducing waste.
moisture retention plastic for gardening
As an affiliate, we earn on qualifying purchases.
As an affiliate, we earn on qualifying purchases.
Practical Tips for Making Soil Solarization Work in Your Climate
- Choose the hottest months—July and August are ideal—when your soil hits peak temperatures. Timing is crucial because the higher the temperature, the faster pests are eradicated. Monitoring local weather patterns helps ensure you’re setting up during the most effective window.
- Use a thick, UV-resistant clear plastic—about 1–2 mil thick—to withstand the intense sun without cracking or degrading prematurely. Cheaper plastics may save money initially but can lead to shorter lifespan and less effective heat trapping, ultimately reducing pest control efficiency.
- Water the soil deeply before covering—moist soil conducts heat more effectively, reaching higher temperatures at pest habitats. This step is especially important in arid climates where soil can dry out quickly, diminishing the solarization process’s effectiveness.
- Secure the edges well—using rocks, bricks, or soil prevents heat from escaping and maintains consistent temperatures. Proper sealing ensures the plastic acts as a greenhouse, maximizing pest kill potential.
- Check soil temperature with a soil thermometer—aim for at least 43°C (110°F) at 5 cm deep. Maintaining the required temperature consistently is key; if it’s too low, pests may survive, and if it’s too high, beneficial microbes could be harmed.
- Leave the plastic in place for at least 4 weeks; longer if pests or pathogens persist. Patience is vital—rushing removal can allow pests to recover or soil to dry out prematurely.
- Remove plastic carefully—avoid disturbing the soil too much afterward. Proper removal prevents reintroduction of pests and allows you to plant immediately or prepare for subsequent planting cycles.
For example, a gardener in Las Vegas might set up her solarization early in July, ensuring she gets maximum heat exposure during the hottest weeks. Consistently monitoring soil temperature and adjusting setup as needed can significantly enhance the success of your solarization effort. Remember, the key tradeoff is balancing sufficient heat exposure with preserving soil health for future planting.
Frequently Asked Questions
How long does soil solarization take to work?
Typically, 4 to 6 weeks during the hottest part of summer is enough to raise soil temperatures to lethal levels for many pests. The duration is critical because it allows pests to be exposed to high temperatures long enough to be eradicated. If the period is too short, some pests or eggs may survive, leading to re-infestation. Conversely, extending the period beyond 6 weeks generally offers diminishing returns and can risk harming beneficial soil microbes. Therefore, patience and proper timing are key to maximizing effectiveness without compromising soil health.
Is soil solarization safe for plants and humans?
Yes. It’s a chemical-free method that uses just sunlight and plastic. When done properly—covering moist soil during the hottest months—it poses no risk to your family or plants. However, always handle plastic carefully to avoid trips or injuries, and ensure good ventilation if working around heated soil. The process does not introduce toxic substances, making it a safe choice for organic and environmentally conscious gardeners.
Can soil solarization be used in all climates?
It works best where the sun’s heat is intense—like desert regions or during peak summer months in hot climates. In cooler or cloudier areas, the effectiveness of solarization drops significantly because the soil may not reach the necessary temperatures. In such cases, supplemental heating methods or longer periods may be required, and results might be less predictable. Nonetheless, in full sun and high heat, soil solarization remains a powerful, eco-friendly tool for pest management.
What kind of plastic should I use?
Standard clear polyethylene plastic, about 1–2 mil thick, is best suited for solarization. Look for options that are UV-resistant to withstand prolonged exposure without cracking or degrading. While biodegradable plastics are emerging as a greener alternative, they may not last the full 4–6 weeks or reach the high temperatures needed for effective pest control. For maximum efficiency, choose a durable, UV-resistant plastic and replace it if it shows signs of wear during the process.
Will soil solarization improve soil fertility?
Indirectly, yes. By reducing pests and soil-borne diseases, plants can grow more vigorously and resist stress better. Additionally, the heat can accelerate the breakdown of organic matter, releasing nutrients and improving soil structure over time. However, it’s not a substitute for organic amendments; combining solarization with composting, mulching, and crop rotation results in a healthier, more resilient soil ecosystem, fostering long-term fertility and pest resistance.
Conclusion
Think of soil solarization as turning the desert sun into your garden’s natural pest army. It’s simple, free, and completely chemical-free—perfect for a water-wise, heat-loving garden.
Next time pests invade, grab a roll of plastic, water your soil, and let the sun do the dirty work. Your plants—and your conscience—will thank you for it.
Fall yard work Picks
leaf blowers
As an affiliate, we earn on qualifying purchases.