TL;DR

Get garden gear delivered free — and shop member deals
- Fast, free delivery on millions of items
- Access to Prime Big Deal Days deals on October 6–7
- Prime Video, Amazon Music and more included
Garlic harvested in May heat needs careful curing in shaded, ventilated spaces at 70–85°F. Store bulbs in breathable containers at cool, dark spots, avoiding refrigerator sprouting. Proper handling extends shelf life and preserves flavor.
Harvest garlic when 4–5 green leaves remain, not later — avoid splitting bulbs.
Cure garlic in shaded, well-ventilated spaces at 70–85°F, avoiding direct sun and high heat.
Brush off dry soil, keep roots and tops intact during curing; never wash bulbs before storage.
Store in breathable containers at 60–68°F; avoid the fridge unless you want sprouting.
In hot climates, softneck garlic lasts longer than hardneck — plan your storage accordingly.
Curing & Storing Garlic Harvested in May Heat
When daytime temperatures climb past 90°F, a garlic harvest becomes a race against sunscald, waxy breakdown, and mold. The fix is a deliberate chain: dig at the right leaf signal, cure in moving air at 70–85°F, and store cool, dark, and breathable — never in the refrigerator in-between zone.
70–85°F
Ideal curing window
2–4 weeks
Cure until necks are tight
30 min
Max direct sun after digging
4–5
Green leaves = harvest signal
90°F+
Waxy-breakdown danger line
60–68°F
Home pantry sweet spot
6–12 mo
Softneck storage life
01 · Harvest Timing
When to Dig: The Heat Changes the Clock
In desert climates garlic matures faster and can go from ready to over-mature in days. Split wrappers mean the bulb won’t store — it goes to the kitchen first, not the pantry.
Read the Leaves, Not the Calendar
Harvest when the lower third to half of the leaves have browned, leaving 4–5 green leaves. Each remaining leaf equals one intact wrapper layer protecting the bulb in storage.
Dig in early morning
Dig, Don’t Pull
Loosen soil gently with a fork and lift. Pulling bruises and nicks bulbs — and bruised bulbs decay in storage. Handle every bulb like a bruise waiting to happen.
Fork, never yank
Beat the Sun Out of the Field
Even 30–60 minutes of direct hot sun can scald cloves, triggering waxy breakdown or mold later. Move bulbs into shade the moment they leave the soil.
Shade within 30 minutes
02 · The Curing Protocol
Cure Without Cooking: Airflow Is Everything
Never cure in direct sun or a sealed shed. Choose a shaded porch, ventilated barn, or a room with a fan. Curing develops flavor as enzymes break down cell structures — rush it and you trap moisture; overheat it and you cook the cloves.
Lift & Shade
Fork bulbs out early morning; into shade within 30 minutes. Tops and roots stay intact.
Spread Single Layer
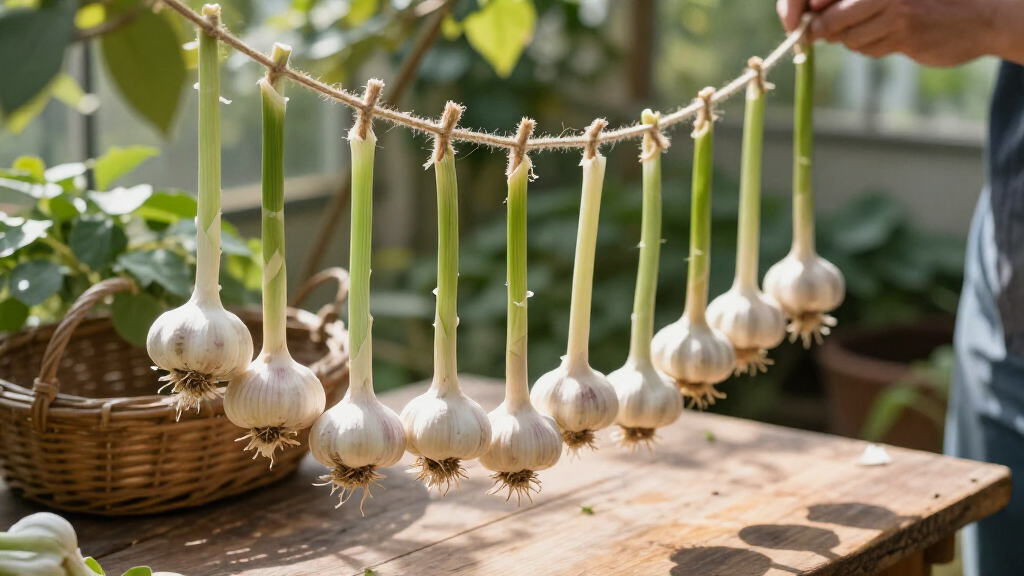
Lay on screened racks or hang small bundles — never pile. Air must reach every bulb.
Move the Air
Run a fan nearby. Hold 70–85°F; above 90°F, move curing indoors.
Wait 2–4 Weeks
Humid Gulf-style Mays need the long end plus mechanical airflow. Patience pays.
Test for Done
Neck tight and dry, skins papery, roots brittle-dry. Then — and only then — trim.
Never wash bulbs. Brush off dry soil gently — added moisture invites Penicillium and black mold.
Never cure in direct sun. Heat plus sun cooks cloves into translucent, rubbery tissue.
Never seal the space. A closed hot garage traps humidity and ruins the cure.
03 · The Temperature Playbook
One Crop, Five Temperature Zones
Garlic dormancy is temperature-dependent: too warm and it wakes prematurely; the 40–50°F fridge zone triggers sprouting when bulbs return to room temperature. Go truly cold or stay at cool room temp — avoid the in-between.
Garlic stored at 40–50°F tends to sprout prematurely in warm climates. Either keep it very cold (~32°F) or at cool room temperature (60–68°F) — the refrigerator in-between is the worst of both worlds.
04 · Storage Playbook
Match the Variety to the Clock
Warm-climate May harvests are usually softnecks plus early weak-bolting groups. Eat the short-keepers first; braid the silverskins for winter.
| Type | Storage Life | Hot-Climate Fit | Pantry Priority |
|---|---|---|---|
| Softneck Silverskin, Artichoke |
6–12 months | Best for desert gardens; braids beautifully once outer skins dry | Eat Last |
| Hardneck Rocambole, Purple Stripe |
3–6 months | Bigger flavor, shorter fuse; trim stems to ~1 inch after curing | Mid Priority |
| Weak-Bolting / Early Asiatic, Turban, Creole |
Shortest storage | Matures April–May in hot regions; Creoles prized by seed savers | Eat First |
Container Verdicts
| Container | Verdict |
|---|---|
| Mesh bags | ✓ Maximum airflow |
| Paper bags | ✓ Breathable, blocks light |
| Braided bunches | ✓ Softnecks; hang in dark spot |
| Old stockings | ~ Works; knot between bulbs |
| Sealed plastic | ✗ Traps condensation, invites rot |
| Fridge drawer | ~ Only near 32°F; watch for sprouting |
Storage Life by Type (months)
Backup plan: bulbs that won’t store become black garlic, powder (dehydrated), frozen, or pickled — value-added processing saves the harvest.
05 · Troubleshooting
Translucent or Moldy? Read the Bulb’s Signals
Both defects mean the bulb’s cellular structure was compromised — and both trace back to environment, not luck. Remove affected bulbs promptly; rot spreads fast.
Waxy Breakdown
Signs: translucent, sticky, rubbery cloves with a watery look and weakened flavor.
Cause: heat stress — curing above ~90°F or sun exposure right after digging cooks the tissue.
Fix: shade + fans + hold 70–85°F
Mold & Rot
Signs: fuzzy blue-green or black patches — Penicillium, Aspergillus, Botrytis neck rot, Fusarium basal rot.
Cause: lingering moisture — washed bulbs, humid curing spaces, or sealed storage containers.
Fix: never wash + ventilate + breathable bins
06 · The Full Chain
From Hot Soil to Winter Kitchen
Dig
4–5 green leaves
Cure
70–85°F · 2–4 wks
Trim
Roots + 1″ stem
Store
60–68°F · mesh
Enjoy
3–12 months
When to dig your garlic in hot weather — signs it’s truly ready
In desert climates, garlic matures faster. Harvest when the lower third or half of the leaves turn brown, leaving 4–5 green leaves. That’s a sign the bulb is mature but not overripe, which causes splitting and spoilage. If you wait too long, bulbs can split open in the ground, especially in May’s warmth.
Imagine loosening soil gently with a fork — no pulling! This prevents bruising. Get bulbs out of the soil immediately, especially in hot sun. Even an extra 30 minutes in direct sun can cook the cloves, leading to waxy breakdown or mold. Timing is everything — harvest too early, and you’ll lack flavor; too late, and they’ll spoil fast.
For example, in my zone 9 yard, I watch for just a few brown leaves and dig in early morning, then move the bulbs into shade fast.
As an affiliate, we earn on qualifying purchases.
How to cure garlic in May heat without cooking it
Curing garlic in May heat needs a careful approach. Never cure in direct sun or sealed, unventilated spaces. Instead, choose a shaded spot with good airflow — a shaded porch, a well-ventilated shed, or a room with a fan. Temperatures between 70–85°F are ideal. Above 90°F, the risk of waxy tissue or rubbery cloves skyrockets.
For example, I spread bulbs on a screened table inside my barn, running a small fan nearby. Keep tops and roots intact. Cure for 2–4 weeks until necks are tight, skins are papery, and roots are brittle-dry. Don’t wash bulbs; brush off dry soil gently — moisture invites mold.
Imagine the aroma of dry, earthy garlic skins filling a shaded corner — that’s the sweet scent of good curing in heat.
Why is this important? Proper curing prevents moisture from lingering inside the bulb, which is a leading cause of mold and rot. It also helps develop the garlic’s flavor profile, as curing allows enzymes to break down cell structures, intensifying aroma and taste. If you rush curing or do it in unsuitable conditions, you risk uneven drying, which can trap moisture inside or cause mold, both of which shorten shelf life and degrade flavor. On the other hand, curing at the right temperature and airflow allows the garlic to dry evenly, preserving its firmness and flavor. The tradeoff is that too low a temperature prolongs curing time, increasing exposure to humidity, while too high can damage the cloves. Finding that balance ensures your garlic is both safe from spoilage and rich in flavor.
breathable garlic storage containers
As an affiliate, we earn on qualifying purchases.
As an affiliate, we earn on qualifying purchases.
Post-harvest handling and storage — keep garlic fresh longer
Once cured, trim roots and cut hardneck stems to about an inch. For softnecks, braid while tops are still pliable but only after outer skins are dry. Gently brush off the dirtiest outer wrapper — don’t wash or peel, as excess moisture invites mold and rot.
Store in breathable containers like mesh bags, paper bags, or braided bunches. Keep bulbs in a cool, dark, dry spot at 60–68°F. Avoid the fridge unless you plan to use bulbs quickly — cold temperatures can trigger sprouting when bulbs warm up again. For example, I keep my garlic in a dark pantry, and it lasts several months.
Why does this matter? Proper post-harvest handling ensures that moisture and dirt are minimized, which reduces the risk of mold and decay during storage. Using breathable containers prevents excess humidity around the bulbs, which is critical in hot climates where condensation can form easily. Keeping garlic in a cool, dark place slows down metabolic processes, extending its shelf life. However, too cold an environment, like a refrigerator, can cause sprouting or softening, which deteriorates quality. Understanding these tradeoffs helps in choosing the best storage method for your specific climate and garlic variety. For example, storing garlic at just the right temperature prevents sprouting and mold, but if it’s too cold or too warm, the garlic can either sprout prematurely or spoil quickly. Balancing temperature, humidity, and airflow is crucial to maintaining quality and maximizing shelf life.
As an affiliate, we earn on qualifying purchases.
Why your garlic might turn translucent or moldy — and how to avoid it
In hot, humid conditions, garlic can develop a waxy, sticky surface or mold patches. Waxy breakdown occurs when heat stresses the cloves, making their tissues translucent and rubbery. Mold, often Penicillium or Aspergillus, appears as fuzzy, blue-green, or black patches.
To prevent this, cure in well-ventilated, shaded spaces at moderate temperatures. Never cure in direct sun or humid environments. After curing, store bulbs in a dry, breathable container, away from moisture and heat.
Why is this important? Mold and translucency are signs that the garlic’s cellular structure has been compromised, which impacts flavor, texture, and shelf life. Mold spores can penetrate the bulb’s outer layers, leading to rot that quickly spreads. Waxy, translucent tissues indicate that the garlic has been subjected to heat stress, which weakens cell walls and makes the cloves more susceptible to decay. Recognizing early signs of these issues allows you to take corrective actions, such as removing affected bulbs promptly or improving storage conditions. If mold or translucency appears, it’s often a signal that environmental conditions during curing or storage were not properly controlled—too humid, too warm, or poorly ventilated. Addressing these factors reduces the risk of spoilage and helps maintain high-quality garlic. Proper environmental management during curing and storage is essential to prevent cellular damage, which directly affects the longevity and flavor of your garlic harvest.
As an affiliate, we earn on qualifying purchases.
Best storage temperatures for garlic — avoid sprouting or spoilage
Garlic stored at 40–50°F tends to sprout prematurely, especially in warm climates. The trick is to store it either very cold or at a cool room temperature. Between 60–68°F, bulbs can last several months but are more prone to sprouting when returned to room temp.
For example, I keep my garlic in a dark pantry at about 65°F. It stays firm and flavorful for 3–4 months. If I want longer storage, I use a root cellar or a dedicated fridge drawer at near 32°F, but I watch for sprouting.
Why is this important? Different storage temperatures influence the metabolic rate of garlic bulbs. At too warm temperatures, sprouting accelerates, reducing flavor and making the cloves bitter or tough. Conversely, storing at very cold temperatures, like in a fridge, can cause moisture to condense inside the bulb, leading to mold or softening if not properly ventilated. The key is understanding that garlic’s dormancy is temperature-dependent: too warm, and it wakes prematurely; too cold, and it risks moisture-related spoilage. Balancing these factors means choosing a storage environment that is cool but not freezing, with good airflow to prevent condensation. This is especially critical in hot climates, where ambient temperatures often exceed ideal storage ranges, requiring extra vigilance to prevent early sprouting or decay. Proper temperature management ensures your garlic remains dormant, flavorful, and long-lasting, making it a reliable pantry staple.
Frequently Asked Questions
Can I cure garlic in direct sunlight to speed up drying?
No. Sunlight cooks the garlic, causing waxy tissue and flavor loss. Always choose shaded, ventilated areas for curing in hot weather.My shed is over 100°F — where can I cure my garlic?
Use an indoor room with a fan, a shaded porch, or a ventilated shed. Keep temperatures between 70–85°F and ensure good airflow to prevent cooking the cloves.How long does curing take in hot, humid weather?
Typically 2–4 weeks. Humid conditions may require longer, plus mechanical airflow. Check that necks are tight and skins are papery before storing.Why did my garlic turn translucent and sticky after curing?
This waxy breakdown results from heat stress. Prevent it by curing in shaded, cool, well-ventilated spaces and avoiding direct sun.Can I store garlic in the refrigerator?
Yes, but only if you plan to use it soon. Whole bulbs tend to sprout when returned to warmth, so keep it in a cool, dark spot instead.Conclusion
Curing garlic in desert heat isn’t about fighting the sun, but working with it. By controlling airflow, temperature, and humidity, you can preserve your harvest’s flavor and shelf life. Think of it as giving your garlic a cool, shaded home — where it can rest and wait for the kitchen.Fall yard work Picks
leaf blowers
As an affiliate, we earn on qualifying purchases.